How to Give Yourself a Crew Cut with Clippers

Before we begin, remember that having the right tools for the job matters.

Note:

Even the easiest haircuts can get complicated a frustrating if you have inefficient tools.

Anyway:

Assuming that you have all the necessary tools, let’s jump in and look at ways of doing a DIY Crew Cut.

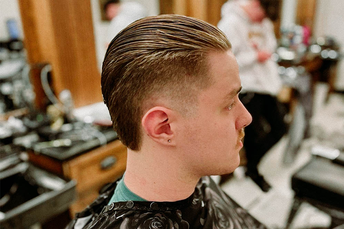
Find an Image Reference

Fun fact:

Images serve as blueprints for any kind of hairstyle.

@cutsbycameron

For new barbers and DIY fans, having an image of the haircut you want will come in handy.

Take time to study the photo in order to plan how you are going to go about doing a crew cut haircut on yourself.

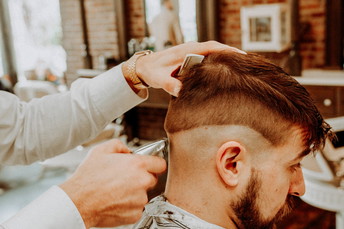
Clipping the Sides and Back

Start by doing a fade on your sides and back.

Now:

Depending on the look you are aiming for, you have the option of doing a taper-fade down to a skin fade.

Another thing you need to know about fade is that it comes in different variations.

It can either be:

  • A High Fade: Starts around the temples.
  • A Low Fade: Starts a bit closer to the nape.
  • Or a Mid Fade: Begins mid-way between the ears and the temples.

Note:

A fade line refers to where the hair transitions from one length to another.

Pro Tip:

Always your clipper up and out when doing a fade. That will leave your sides looking neat and evenly trimmed.

Learn more about fading in this in-depth guide on how to cut proper fades.

Cut and Style Your Top Hairs

There isn’t much to do here.

If you are aiming for a standard Crew Cut, remember to keep the top hair short and sides/back shorter.

On the other hand, if you intend on styling your tops part, you can leave it long – up to 3 inches long.

Final Touches and Blending

Note:

Blending is simply the process of smoothening out layers of differently sized hair to create a smooth transition from layer to layer.

Basically, this is where you perfect your sides and back to give them a smooth fading effect.

Now:

Blending isn’t so hard; what you do is find a guard or blade size that’s between the sizes of the two adjacent layers.

For example:

If Layer1 is a #0 and Layer2 is a #1, you should use a #0.5 to do the blending.

Yes! It’s that easy.

And finally, you can do a nice hairline design – if need be – to give your haircut a sharp, stylish, and professional-looking finish.

Frequently Asked Questions

Start by choosing your preferred crew cut hairstyle. The important things to note about the hairstyle are the length on top and how you want to style it and the sides.With that in mind, assemble the right tools and start cutting, starting with the back and sides. Since crew cuts have a fade on the sides decide if you want a high, medium, or low fade. Finish with the top and style it accordingly. Depending on the length you can style the top into a side part, comb over, or pompadour.
It's not easy to give yourself a crew cut but it's possible. First off, cutting the sides is not an easy task especially if you are tapering. Secondly, the crew cut entails fading the top starting from the forehead to the crown and then merging it with the sides and back.The trick is to cut the hair slowly and have two mirrors to see the progress as you cut. You can also ask a friend to help.
If you are cutting a crew cut for the first, I'd suggest starting with a crew cut variation that is easier to cut. This includes the classic crew cut or a textured crew cut.On the sides avoid a taper fade since it is challenging to cut. Instead, go with a high fade since it's easier to cut. Then on top avoid a complicated style, if you don’t know how to do it.
The easiest way to get a crew cut is getting your hair cut by a professional barber. Since the crew cut is a popular haircut most barbers know how to cut it. Your barber will also guide you on the perfect variation depending on the shape of your face.This is especially helpful to those with a triangle, heart, or diamond face shape since these face shapes require special attention when cutting a crew cut to make sure the cut looks good.

More from Mike Medders

Blog
How to Talk to Barbers

How to Talk to Barbers Like a Pro: Insights from Expert Barbers

Mike Medders
Written by Mike Medders

Trust me, I've been on both sides of the chair. I can't count the number of times a client has sat down and struggled…

Read more
Blog Hair Hairstyles
Slick Back Haircut

Slick Back Haircut

Mike Medders
Written by Mike Medders

Barber Spotlight: Slick Back Haircut Transformation by Nat The slick back haircut is a timeless classic, combining…

Read more

Comments

Newest articles

How Often Should You Go to the Barber? Expert Advice & Tips

Ever wondered how often you should be visiting the barber? Well, you're not alone. It's a question that's crossed the…

Building Barber Clientele: A Comprehensive Guide for Success

In the challenging world of barbering, it's not just about mastering the latest trends and techniques. The real game…

How to Ask for a Fade Haircut According to Barber Sunny

Ever wondered how to walk into your barber shop and confidently ask for the perfect fade haircut? Well, you're in the…

Join 8,982 users to get special deals on barbers and hairstylist equipment EVERY month

  • Special deals
  • Limited-time discounts
  • Discount coupons
  • Prize-Winnning contests

Privacy Policy