How to Give Yourself a Buzz Cut Haircut at Home

In truth:
The buzz cut is a pretty straight forward hairstyle that you can do in front of your mirror at home.
However:
It tends to get complicated if you decide to combine it with other kinds of haircuts for a better look and improved style.
Now, with that said:
Here are some nice tips to set you on the path of getting a professional-grade buzz cut at home.
Analyze Your Head and Face
In this first step, you want to figure out which kind of buzzcut looks good on you.
So, get in front of a mirror and analyze your head and face.
But, here’s the thing:
Although the buzz cut haircut is a pretty versatile hairstyle, it might not always be the best style for everyone.
There are several ways you can check to see whether it will bring out your handsome self.
With that in mind:
Here is a short guide to help you determine if the buzz cut will suit your face shape.
A buzz cut will pair perfectly with:
Some other acceptable matches are:
- Oval faces: With a buzz cut, men with oval faces will experience softened features and the face might become round. However, a bit of stubble can improve this.
- Triangle faces: Although a buzz cut can bring out the strong jawline it can also disrupt the forehead’s proportions. To overcome this, try a longer buzz cut with a heavier coat of stubble.
- Heart-shaped faces: A buzz cut on this face shape might reveal a bigger forehead. So, you might want to be careful.
Incompatible matches are:
- Round faces: Due to the buzz cut’s inability to render round faces more angular, those with this face shape will find it difficult to wear this haircut. Basically, it won’t look great.
Bottom line:
Face and head shapes matter.
And now that you know this, let’s move on.
Gather the Right Tools for the Job
Before we get on with the cutting, here are the tools you’ll need for the job:
- A high-quality hair clipper: You’ll need a good haircutter set that will remove hair by the bulk without pulling it or stalling.
- Preferably two mirrors: One of the mirrors should be handheld. This will help you see how you buzz the back of your head.
- A comb or brush.
Do you have everything in place?
If so, let’s get down to the actual work…
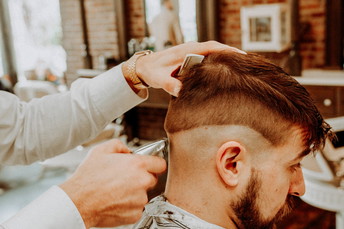
Start Clipping
Assuming you have everything you need, here’s what you should do:
Start by combing your hair to lift the strands off your scalp; plus, this will make it easier for you to cut it.
Next, decide on the length you want and adjust your hair clipper accordingly and start clipping.
Now:
While trimming, start with one side and work your way around the back to the other side.
Note:
If you are planning to use a #2 clipper guard then it would be a good idea to start with a #4 and see how it looks; remember, you can always reduce it as you go along.
Also, don’t forget to gently fold the ear and trim behind it.
And once you’re done with the sides, you can move over to the top.
Lastly:
Since your hair pattern can get complicated around the crown area, make multiple passes by moving the clipper back and forth in different directions.
Quick DIY Buzz Cut Clipping Tips for You
- Always cut hair against the grain, that is up and out if your hair grows downward. Going with the grain will lead to an uneven cut/result.
- Brush your hair with the grain to see if you have missed any patches. Don’t be afraid to do a few passes until you get a nice, consistent haircut.
- You can always shorten your hair if the need arises, but you can never make it long once it’s been cut. Therefore, start with a longer size and work your way down until you achieve your desired length.
And that’s just about everything you need to do when clipping.
It’s easy, right?
Anyway:
For those who prefer taking their buzz cut to the next level, things don’t stop here.
For example:
If you are doing a Buzz Cut Skin Fade, here’s what you need to do next…
Start the Fading Process
Get this:
Fades aren’t easy DIYs, but they are also not impossible.
If you are determined on doing your own fade, here’s how you go about it:
So, start by deciding what type of fade you want; high, low, or mid.
Next, you’ll want to skip one clipper size down from the one you used to trim your final buzz in step 3.
For example:
If you used a number 3 for the buzz cut, you’ll want to skip number 2 and use a number 1 for the fade.
Depending on the type of fade you want, create horizontal layers of different-sized hair along your sides and back.
That means using different guard and blade sizes in descending order as you move away from the borderline between the top part of your head and the beginning of your fade.
Quick Tip:
A while back, I wrote a post on how to do a proper fade. I think it might come in handy for any novice barbers reading this.
Once you have all the fading layers ready, the last thing to do is to blend them.
Learn how to do that, next.
Blending and Finishing Touches
Here:
You’ll want to make the fade line completely disappear and the transition from longer to shorter hair seamless.
This is where that clipper guard and blade size you skipped comes in handy.
Use them to trim on the fade line.
You will probably have to do multiple passes to get that fade line down.
Also:
You can remove the guard (if you have one) and adjust the clipper blade to a long or short position for an even closer trim.
If you make an error, visit your local barbershop to get it fixed.
Frequently Asked Questions
More from Mike Medders
How to Talk to Barbers Like a Pro: Insights from Expert Barbers

Trust me, I've been on both sides of the chair. I can't count the number of times a client has sat down and struggled…
Slick Back Haircut
Barber Spotlight: Slick Back Haircut Transformation by Nat The slick back haircut is a timeless classic, combining…
Comments